SUMMARY: The most effective strategy to combat physical aging is to bring some intensity &…

SIT-TO-STAND: A MOVEMENT ESSENTIAL DONE WELL
I always emphasize over-50/senior fitness begins with improving fundamental movement and body control skills. My clients typically improve movement with functional (feet-on-the-ground) exercises I teach them in the gym, but often need to build an awareness to apply the same skills to every-day life movements in other environments.
A prime example is the way they manage changing vertical levels – like sitting to standing or vice versa. Training with me, a client learns to perform a standard bilateral squat (two legs, feet apart) with good alignment and proper stabilization. But what if I ask them to get up from a chair, which is basically the exact same movement as a squat? Well, they will often express sub-optimal body positions and/or unstable movement because they forget to apply the same body control concepts they already know and use with exercises like the squat.
We have to change vertical levels many times a day, every day. It’s a universal and unavoidable fact of life, so it’s important to manage it in a body-respecting manner. Each time we change levels – from a car, a couch, a seat or a toilet – we can take good care of our body by using movement skills which minimize physical wear & tear or we can express sub-optimal movement which creates unnecessary stress and wear/tear on our joints and tissues. And please keep in mind the more physical issues you have or the weaker you are, the less tolerance your body probably has for additional stress or wear & tear, so it’s essential to take seriously the use of body-friendly techniques.
This post I’ll cover the movement/body control skills to use when changing vertical levels. To get the most out of this post you should hopefully have mastered the concepts from two previous posts: the 7-Point Alignment Exercise and the Wall Hip Hinge Pattern (WHHP). The 7-Point Alignment Exercise gives you a template to organize/stabilize your body against gravity. The Wall Hip Hinge Pattern applies the 7-Point Alignment Exercise’s stability concepts into an easy-to-do dynamic pattern which models the hip dominant movement necessary for changing vertical levels (like sit-to-stand) in a body- respecting manner.
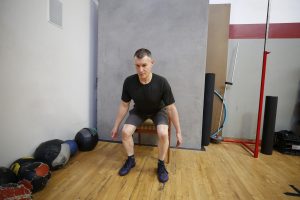
SIT-TO-STAND MOVEMENT SKILLS
The functional goals behind the actions/positions described below are to optimize joint/spine stability, weight transfer from butt to feet and force production. Optimal joint/spine stability minimizes wear & tear and maximizes force production through the ground when you apply your muscle power to rise up or lower down. To easily apply the concepts, it helps to take a systematic approach, so we start our sit-to-stand organization/activation process at ground level and move up the body.
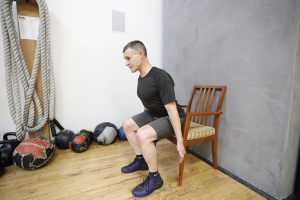
Initial Seated Positioning: Move closer to the edge of whatever it is you are sitting on so it’s easier to transfer your body weight from your butt to your feet when you rise up.
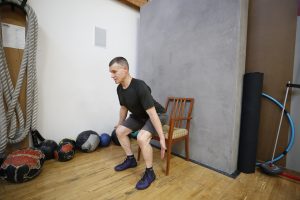
Feet Position and Action: Place your feet facing straight ahead, slightly wider than hip width apart and just behind your knees. Now, screw your feet into the ground as if you were trying to spread the floor – this action will create a firm arch/foot position to transmit force through the ground and accept your full body weight. If you have trouble placing your feet straight ahead, it’s OK to have your feet turned out slightly, but the more you turn out the harder it is to create a firm arch/foot position. If you lack forward movement in your ankles, you will likely be used to turning your feet out as a compensatory strategy – that’s how your body makes the best out of a sub-optimal movement situation – but the turned out position is not doing you any favors for walking or changing vertical levels.
Knee Position and Action: Drive your knees apart laterally while keeping your feet flat on the floor. Your knees should stay well apart and never track inside the ankles. Ideally, your knees should track in-line with the outside half of your foot. Like above, the more you turn your feet out, the harder it is to drive your knees apart, so again I emphasize your feet should be positioned as straight-ahead as possible.
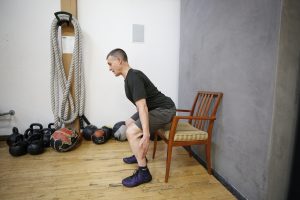
Hip Position and Action: Hinge forward from your hips before you try to stand up – your upper body should move forward toward your thighs. This action helps load and activate your hip and butt muscles and starts the process of transferring your body weight from your butt to your feet.
Abdominal Action: Brace your abdominals. This means create some firmness by contracting your abdominal muscles – as if someone was going to punch you in the mid-section and you were protecting yourself from the blow. This bracing action doesn’t have to be too vigorous for lifting your body weight from sit to stand, but it is very important as it creates stability in your trunk and spine, reduces spinal stress, and allows for efficient force transfer through your trunk/spine from your feet and legs. If you have trouble with this bracing concept, please practice the bracing action by itself and use your fingers to check if you are creating some firmness in your mid-section.
Trunk Position and Action: Strive for a straight and firm trunk with your shoulder blades pulled back and your upper back muscles activated to prevent rounding forward and your chest caving in.
Arm Position and Action: You have at least three options depending on the situation and your physical capabilities: 1) Arms can remain at your side; 2) lift your arms forward up and away from the body; 3) use them to push off the seat to aid in rising up. Lifting your arms forward up and away from your body helps with weight transfer and balance from seated to standing, so is an all-around good choice. An arm/hand push off your seat can give you a small boost if absolutely necessary, but this action can compromise your ability to maintain a straight and firm trunk.
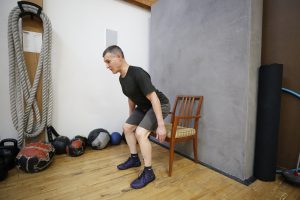
Rising Up to Stand Muscular Action: Drive your feet through the floor and your head and chest through the ceiling! You are trying to extend (straighten) your hips and knees at the same time to avoid your knees thrusting forward or your hips rising before your chest.
Walking Cane as a Level Change Aid: If you use a cane, it can be used to aid your rising up action by placing it between your legs, with both hands on top of the handle. Then, as you start to rise up, drive your hands straight down through the handle as if you were trying to drive the cane through the floor. An important caution is the cane must remain perpendicular to the ground or you risk the cane losing purchase with the ground and slipping/sliding.
Potential Stress Points and Force Leaks: If you can’t or won’t create the positions and actions above, you will add additional stress to your joints/tissues and allow force leaks which make it harder for you to lift your body up. A force leak means some of your muscle power is dissipated within the body rather than transferred through the body to power you up to standing. The most common force leaks I see are: 1) feet caving in and losing an arch; 2) knees coming together to create a dangerous valgus knee position (see here); 3) lack of hinging forward from your hips and 4) failing to brace abdominals.
A Word About Pain: I’ve outlined a strategy for organizing your body to manage the transition from sitting to standing in the most body-respectful manner possible. It’s possible you might get pain when you try to apply one or more of the positions/actions. Then, you might ask: should I try to push through some pain/discomfort for better technique? Or, should I settle for something less than optimal? I don’t’ know the correct answers for you as an individual, but I am very sorry you have to deal with pain/discomfort. Pain should be respected, so it’s best addressed on a case-by-case basis in consultation with your physician and, ideally, your physical therapist.
Related Posts