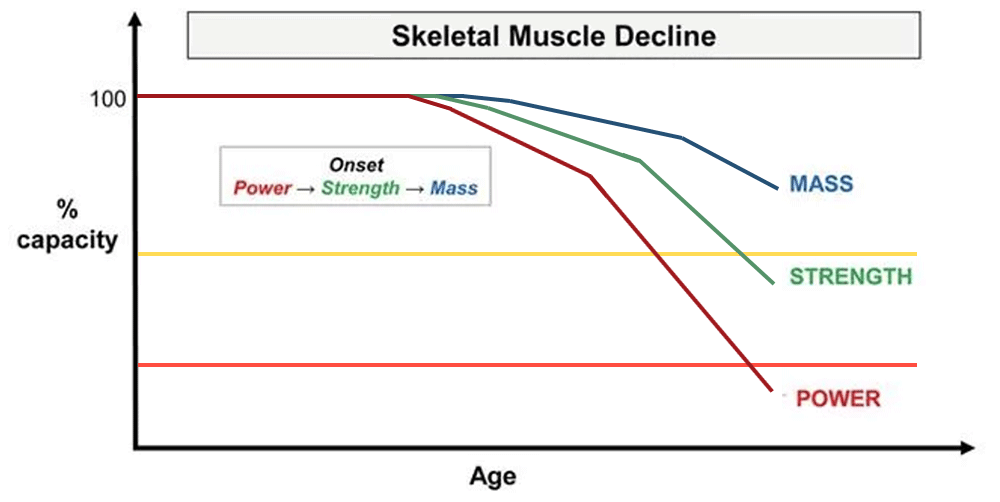
SUMMARY: The most effective strategy to combat physical aging is to bring some intensity &…

CORE TRAINING FOR SENIORS 2: PENCIL ROLLS AND THE “ANTI’S”
The core, often misunderstood to be just the abdominals, is actually the whole midsection or trunk of the body from hips/pelvis to the neck. Last post, I covered why it’s so important for seniors to have a functionally fit core and discussed the first core exercise everyone seems to try – the abdominal crunch – and explained why it’s such a poor core training exercise.
So, a “functionally fit core” – what does that mean? Last post I explained that, for most of us, the core doesn’t need to be particularly strong or move us dynamically; rather the core has to work automatically/reflexively, without our conscious input, to prevent unwanted motion. Last post, I also offered several beginning core training activities which “wake up” essential reflexive core function and provide a basic start toward a functional core, which is a foundation for living and moving safely and efficiently.
This post, let’s advance senior functional core training a bit more with another core “wake up” activity and three basic core training exercises which focus on the essential stabilization function of the core – which means preventing unwanted movement – particularly of the spine.
CORE “WAKE UP” 1.2 – BACK-TO-BELLY PENCIL ROLLS
Years of sitting, abdominal surgeries or bouts of low back pain can all conspire to put the essential reflexive functions of our core to sleep by not allowing it to automatically activate when we need it. Mastering the exercises in last month’s post will give you a healthy start to waking up (activating) your essential core functions and this post’s back-to-belly pencil rolls will take reflexive core activation to the next level by introducing some body movement.
Back-to-belly pencil rolls – see here, here and here (through first minute only) – are one of the first things we learn to do as infants – it’s primal and basic core function to stabilize our spine and link upper and lower body segments to allow movement to occur. Back-to-belly pencil roll means starting face up and finishing face down. They need to be performed in both directions – left-to-right & right-to-left – and can be initiated three ways in order of decreasing challenge: 1) with the upper body through the head/shoulder/ arm; 2) through the lower body with a leg; or 3) combining both upper and lower body actions.
You should concentrate on mastering the upper body roll (#1 above), but if that proves too challenging then add a lower body component by driving a leg across your body to help initiate the roll and then gradually reduce the contribution of the leg. It’s extremely important to note any directional asymmetry and practice the harder direction until it feels and looks the same going both ways.
Much like the basic core activation activities I covered last post, you don’t need to do pencil rolls forever, but you should consider them an activity to master before moving on to more advanced core training; just as you had to do when you were an infant.
One performance recommendation: Pencil rolls performed from belly-to-back (starting face down) are much more challenging and best left until you’ve mastered back-to-belly rolls. So, at least initially, I don’t recommend going all the way to your belly and landing face down (180 degree roll) because you’ve got to safely return to the starting position on your back. Instead, just roll until you are on your side (90 degrees) and then gently lower back down to your face up position.
So what about those belly-to-back rolls where you start face down? More challenging but important to attempt after you’ve mastered the back-to-belly rolls. Care needs to be taken though, because in addition to being more challenging, they can also be a mine-field of poor technique. I find a lot of compensatory actions occurring with belly-to-back rolls –inappropriate or counterproductive technique – most common is pushing off the floor surface with the grounded arm and hand. Like the back-to-belly roll, the belly-to-back roll is correctly performed by initiating movement with the head and “up” shoulder/arm; not the grounded arm by pushing off floor. If proper initiation is not possible, tip up one side of your trunk with pillows/cushions to create a partial movement – instead of a 180 degree roll, maybe more like 120 degrees – so you can make the movement less challenging to create some success with proper technique so you challenge and stimulate the reactive/reflexive core.
INTERMEDIATE FUNCTIONAL CORE TRAINING
Intermediate functional core training focuses on linking upper and lower body movements through a firm and stable trunk and preventing excess spinal movement when external forces are applied to or through the body. These exercises are often called “Anti something” because the body is subjected to a force (often gravity) which would cause the spine and trunk to bend in a particular direction, but the goal is instead to remain stable and firm. For healthy movement and daily life, we need to be able to prevent unwanted spinal movement in four directions – flexion (bending forward), extension (bending backward), lateral flexion (bending sideways) and rotation.
STATIC FRONT (PRONE/FACE-DOWN) PLANK: The front plank (like the headline photo above) is an “anti-extension” core stabilization exercise because the goal is to not let your trunk, spine and body bend backwards (belly toward floor) creating a “C” shape. Since no movement is occurring, the beauty and effectiveness of the plank is very much in the position maintained and the muscular activation that occurs – doing it wrong is probably worse than not doing it at all! There is a range of opinion about what constitutes good/bad position and technique for the plank so don’t be surprised to come across other variations from what I suggest for positioning and muscular activation.
The first two minutes of this video gives a good overview of the three basic front plank positions I value most: From least to most challenging – 1) forearms/knees; 2) forearms/feet; 3) push-up position (on hands with straight arms/on feet). Note that any of these positions can be made less challenging by placing the hands or forearms on an elevated surface to reduce the effect of gravity.
Your goal for a front plank should be a straight body position with your spine in the same position as when you are standing – like the headline photo above. Some people teach tucking your pelvis/hips under to increase abdominal activation – but I don’t consider the plank an “abdominal” exercise – it’s a whole body exercise and you’d never tuck your pelvis/hips under to squat, climb stairs, carry or pick up a heavy or awkward object, so why train the core in that position?
For all versions and at all times during a front plank you should maintain your breathing – just as I emphasized for the core activation exercises I introduced in my last post.
Elbows or hands should be right under your shoulders. One common mistake I see is hands or elbows too wide. Also, if on forearms, it’s often common practice to link fists together or place hands next to each other – avoid this as well if you can – your hands and lower arms should be in line with your shoulders and upper arm.
Now for the tricky part because you can’t see it, you have to feel it – muscular activation:
A) If on your knees, your abdominals and glutes should be activated (contracted) and you should be gently trying to pull your elbows and knees towards each other – no movement should occur, but that’s the action you’re trying to create.
B) If on forearms/feet, your abdominals, glutes and thigh muscles should be activated and you should be gently trying to pull your elbows and feet closer together – again, no movement should occur, but that’s the action you’re trying to create. Also, your knees should be locked and your hips should be level with your shoulders – not higher or lower.
C) If in the pushup position, your abdominals, glutes, thighs and calves should be activated – you should not let your heels move toward to floor, but instead be actively pushing your heels toward your head. Lastly, you should be lightly “screwing” your hands into the floor – right clockwise, left counter clockwise – no movement should occur, but that’s the force you’re trying to create.
Have someone look for any twisting or leaning of your body to either side – this is a compensation that will just re-enforce any dysfunction you already have going on so it needs to be corrected.
Start with holding the plank position for as little as 5-10 seconds – shorter is better to maintain quality position and muscular activation. You can build up to 60 seconds, but only if position, breathing and correct muscular activation can be maintained.
STATIC BACK BRIDGE AND CORE ACTIVATED BACK BRIDGE: “Static” refers to no movement and “back” refers to supine or face-up position. “Core activated” refers to creating a force through your arms to enhance core activation. You will often see this exercise referred to as a “glute” bridge and most often see it demonstrated as a dynamic action where the hips hinge and unhinge, but I recommend starting with the static version – see here and here – and master the position and variations I discuss below. The static back bridge is an “anti-flexion” core stabilization exercise because the goal is to prevent your hips and trunk from bending toward the ground.
You should have a straight line from your knees to your shoulders – you should avoid pushing your hips/trunk up so far that you create excessive spinal extension (arching) – hips too low are preferable to hips too high – and abdominal activation helps to prevent this. Also, feet should be in line with your hips – not wider or narrower – and heels should be fairly close to your butt. Breathing needs to be maintained at all times. Feet can be flat on the ground or the forefoot can be elevated so you are on your heels.
Like the front bridge, some people advocate tucking your hips/pelvis under – again I don’t advocate this approach for the same reasons noted above.
Some people also advocate squeezing your knees together on an object like a ball or yoga block to increase “core activation” – I do not advocate this approach either since one of the most common dysfunctions I see in seniors is knees coming together (hip adduction/knee valgus) during lower body movement patterns, so I see no reason to encourage or facilitate this common dysfunction during core stabilization training. I prefer to enhance activation of the core by using the arms for the core activated back bridge as illustrated here and here.
The static back bridge can be progressed from both feet on the ground to “marching” from one foot to the other and then to single leg with one foot on the ground as seen here. I highly recommend you move through the progressions until you can do a static single leg back bridge (SSLBB) for at least 30 seconds. One of the advantages of the SSLBB, if you are ready for it, is it also turns this activity into an anti-rotation exercise as well.
Again, much like the plank, please have someone observe you to look for any twisting or leaning of your hips or trunk to one side or the other and correct this compensation.
PALLOFF PRESS: The Palloff Press is an “anti-lateral flexion and rotation” core stabilization exercise done in the kneeling, half-kneeling or various standing positions, with the arms moving from bent at the elbow to straight at the elbow and the rest of the body still. This exercise can also be done statically with no movement of the arms – either hands on chest or arms fully extended – hands on chest version is much less stressful than arms fully extended. If you have low back pain or have any doubts about spine or shoulders, keep your hands on your chest for a while.
The side bridge (see here @ minute three) is often the first “anti-lateral flexion” exercise attempted or recommended. For some seniors, I find this exercise can be a can-of-worms if there is any neck, shoulder blade, shoulder or low back dysfunction present, so I much prefer the Palloff Press as a start point.
The Palloff Press can be performed in standing, full kneeling or half-kneeling. Several different standing positions are an option moving from less challenging to more challenging – 1) parallel stance like a two legged squat; 2) split stance with weight equalized between front and back leg; 3) split stance with most of the weight on the front leg.
The most basic and safe position is the standing parallel stance – I like to have a slight hinge in the hips, as if you were just starting to hinge down and back for a squat. Chest is up, shoulder blades are back, and head is up with chin pulled back toward the spine. Abdominals, glutes and thighs are engaged and breathing is maintained throughout.
The Palloff Press can be performed with a cable machine, handled elastic cords or elastic or rubber bands of various thicknesses. Whatever the resistance method, the handle or cord should always be placed first in the hand farthest away from the cable, cord or band anchor point and then the closer hand should close on top of the distant hand. This method helps equalize muscle activation and ensures you can use both arms/shoulders to stabilize the cord/band and/or create movement of the arms.
You, of course, need to perform this facing both directions so you challenge both sides of your body. If you notice one side is significantly more challenging to do, then double or triple up on the more difficult side until both sides feel the same.
You should look to work up to performing 10 to 15 slow cycles of elbows bending/straightening if you are performing the dynamic version, or up to 30 seconds or longer if you are performing a static (no arms moving) version.
Related Posts