SUMMARY: The most effective strategy to combat physical aging is to bring some intensity &…

GROOVE YOUR HIP HINGE PATTERN
For over-50 adults and seniors, the place to start fitness development is optimizing fundamental movement and body control skills. This is important because many aging adults express dysfunctional movement patterns which contribute to unstable and inefficient movement and place needless wear & tear on joints and tissues.
KNEE DOMINANCE
A movement dysfunction I see often is knee dominance. An example of knee dominance is first loading the knees by thrusting them forward to bend before the hips hinge back and down when lowering to a chair. Knee dominance is common with activities that involve moving up and down – like sitting/standing or squatting – and can contribute to inefficient and unstable movement and also add extra stress to joints and tissues.
HIP DOMINANCE
Here’s your hint for better movement: notice there’s plenty of muscle around your hips, but little around your knees and ankles. We need to get all that muscle working for us, so for a movement strategy which preserves joints and tissues we should cultivate hip dominance. Hip dominance just implies the hips take the lead by being loaded first. The hips are loaded first because they are the main lower body movement driver and are designed to carry the load. Of course we do share movement between our ankles, knees and hips – so our knees and ankles will bend and straighten – but healthy movement should be initiated by the hips.
I chose my headline photo to help give a visual example and comparison of “hip dominance” and “knee dominance”. Please notice the woman on the right and the younger man on the left in the purple shirt. Both are performing a bilateral squat pattern but with clear differences. The younger man is using his hips well, but note the woman’s knees are thrust forward expressing knee dominance.
Primary hip function is a cornerstone of healthy movement – and particularly over-50/senior fitness – so aging adults can always use methods to reformat and enhance hip functional ability. Especially so, since our hips are prone to going “offline” from lots of time spent in the toxic sitting position (see START AT THE BEGINNING post for more on sitting).The Wall Hip Hinge Pattern (WHHP), which I introduce below, is a simple method to help wake up primary hip action and groove the fundamental hip hinge pattern. An automatic and dominant hip hinge pattern allows us to change levels (move up and down) safely and efficiently in a body-respecting manner.
REVIEW 7-POINT ALIGNMENT EXERCISE
At this point, please review my previous post, the 7-Point Alignment Exercise, as it’s a foundational strategy for maintaining stability and alignment with movement. You’ll need to incorporate most of the subtle internal muscular actions of the 7-Point Alignment Exercise to hold your body in an optimal position while performing the WHHP. In fact, it’s helpful to think of the WHHP as a dynamic (moving) 7-Point Alignment Exercise, so please take some time to master it before attempting the WHHP.
WALL HIP HINGE PATTERN
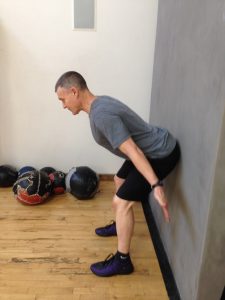
The objective of the WHHP is to hinge your hips back to lightly touch a wall and return to standing without your knees moving forward – which means your lower legs remain perpendicular to the ground. You’ll need a wall to let you know how far to hip hinge and to keep you safe from falling when learning. The goal is to groove this pattern of hip dominant movement so it becomes automatic and instinctual – so practice it often – but only if you can practice it well. The WHHP can also serve as a light warm up for more demanding exercises and activities and I use it often during my training sessions with clients. The primary actions, positions and descriptive photos are described below.
DESCRIPTIVE PHOTOS
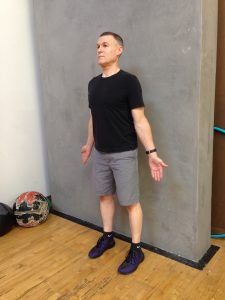
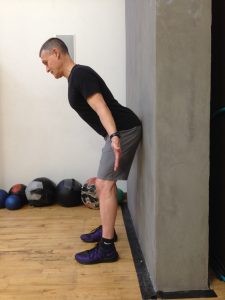
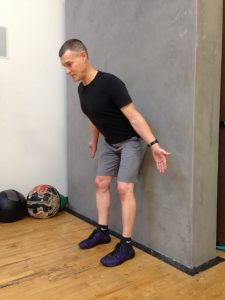
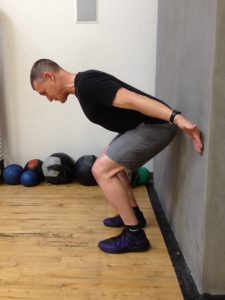
The first photo represents the start/finish position; the next three photos represent the mid-point position; the next photo represents the main action to be avoided at all costs, which is the knees migrating forward during the pattern; and the final photo represents the first progression, which is to move your feet further from the wall.
You may notice the mid-point position photo doesn’t show a lot of hip hinge action – that’s because I’ve intentionally started with my feet close to the wall so my hips can’t hinge much before contacting the wall. Starting close to the wall is important to allow you to become familiar with the hip dominant action and helps for fewer moving parts as you learn to keep the rest of your body in a good position. Once you have a clean small range of motion WHHP you can progress to a greater range of motion WHHP by moving your feet further from the wall (see below “First Progression”).
WHHP ACTIONS AND POSITIONS
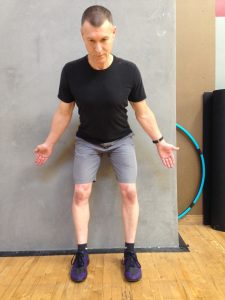
Start Position: Feet straight ahead about hip width apart and your heels no more than half of your foot length away from wall (4-5 inches). Your over-all body position is a fully activated 7-Point Alignment Exercise as per previous blog post.
Initiation of hip hinge pattern: Hinge your hips by sitting your bottom back and down toward the wall at a slow, controlled speed.
Mid-point action: While remaining balanced on your feet, continue to sit back with your bottom until it lightly touches the wall behind you. You should not be leaning on the wall – you need to remain balanced on your feet at all times.
Mid-point position: A) It’s critical your lower legs remain perpendicular to the ground to prevent your knees from migrating forward and dominating the action. Your knees will bend – in service to your primary hip action – but they should not move forward. B) Your knees should also remain well apart as viewed from the front – they should not track inside your ankles and, optimally, they should track to the outside (lateral) half of your feet. C) Your head, shoulders and rib cage should remain straight and in alignment with your pelvis as your hips hinge with no slumping or rounding. Emphasizing actions # 4, 5, 6, & 7 from previous post’s 7-Point Alignment Exercise will help ensure a solid torso position. (For action #6, focus only on lightly pulling your shoulder blades closer together since your arms and hands will not touch the wall)
Finish Position: Without any forward knee movement, unhinge your hips to return to the start position using your gluteals (butt muscles) as the movement driver.
Visual fix: Your eyes should fix to a spot on the floor about 3-4 feet in front of your body.
First Progression: If you can remain balanced on your feet and also keep your knees from thrusting forward or together, you can progress this drill by gradually inching further away from the wall so you will hinge deeper at the hips by the time you contact the wall.
ERROR FIXES AND NEXT POST
You may notice I keep emphasizing that the knees should not move forward since the point of the WHHP is to encourage hip dominance. So, if you do find your knees are moving forward, I strongly suggest you stop practicing the pattern and employ the fix I outline in the next post.
Also in the next post, I will cover fixes for knees moving laterally together (tracking inside the ankles); forward slumping shoulders/rounded upper back; and falling against the wall (which is a way of saying you’re not staying balanced on your feet).
Finally, in the next post, I will describe a couple of other progressions for the WHHP to keep you moving along!
Related Posts