SUMMARY: Previously, I’ve discussed many exercise & physical activity strategies to help older adults (OAs)…

THE IMPORTANCE OF DOING EASY THINGS: WALKING EDITION # 2
SUMMARY: Walking ability is essential for older adults (OAs) to maintain independence and is the entry point for a physically active lifestyle; importantly walking has documented health & longevity benefits as daily step counts increase. But walking gets more challenging with age and walking gait characteristics change in limiting ways with age compared to our younger selves. What does science say we can do about these limiting age-associated changes? Can OAs re-create a more youthful walking gait? That’s the focus here as I cover an interesting study that compared young adults and OA’s walking characteristics under standardized gait conditions while examining several lower body strength and joint-tissue range-of-motion (ROM) parameters. The study’s conclusions are hopeful for OAs as the results offer a couple of simple, straight-forward things OAs can work on to re-create a more youthful walk by improving: 1) calf strength; and 2) hip extension – the ability to bring your upper leg behind your hip. These two factors alone won’t solve all OAs walking challenges, but it’s a great evidence-based place to start, especially if you haven’t had an individualized physical assessment, because calf strength & hip extension ROM are often sub-optimal in OAs.
INTRO
Last post, I covered the research which supports that walking is good for improving older adults (OAs) health, wellbeing, and lowering risk of death. But walking, as a comparatively “easy thing”, gets more challenging with age: OA’s walking gait characteristics can change significantly in limiting ways compared to our younger selves.
Everyone has seen the common age-related walking changes: gait speed slows down; stride length decreases; gait becomes less fluid and more rigid; feet clear the ground with less space and may even shuffle; vertical postural alignment becomes less vertical with the trunk leaning forward from hips/spine.
I’m most interested in what we can do about these changes: can OAs re-create a more youthful walking pattern? Are OAs choosing to walk more slowly or with less step length? Or are OAs forced into these walking changes because of age-related losses in strength, power or joint/tissue range-of-motion (ROM), or other functional deficits that we can improve with focused training?
What does science say we can do about it? That’s what I’m discussing this post: a great study that matched OAs and younger adults (YAs) and controlled for (kept standard) walking speed & stride length and examined several metrics of hip/leg strength and joint ROM. This study’s results give OAs some simple, straight-forward “low-hanging” fruit to work on to improve our walking ability and re-create a more youthful walking pattern.
STUDY COMPARING OLD & YOUNG ADULTS WALKING CHARACTERISTICS
This study, with the important conclusions in the title is:
The study was conducted by Drs. Dennis Anderson, Ph.D. and Michael Madigan, Ph.D., from Harvard Medical School and Virginia Tech University, respectively.
The study compared walking characteristics in 10 healthy YAs & 10 healthy OAs who were matched by sex and height/weight (Average age = 24 for YAs and 80 for OAs).
The study had three walking conditions:
1) Slow speed at 1.1 meter/second (2.5 mph)
2) Fast speed at 1.5 meters/second (3.4 mph)
3) Individualized Self-selected gait speed
The slow & fast walking conditions were chosen because they were speeds that corresponded to commonly reported self-selected gait speeds for OAs (slow speed) and YAs (fast speed). Moreover, participants were cued to a standardized, set stride length by stripes painted across the walkway and were also cued to the particular fast or slow walking speed condition by a moving belt beside the walkway.
So that all readers are on the same page before discussing results:
*Hip Extension (HE) is the ability to bring your leg behind your hip – in a stride stance (legs split front-to-back), the trailing leg is in hip extension.
* Plantar Flexors (PF) are your calf muscles on the back of your lower leg, which enable you to actively lift your heel off the ground and help propel you forward or upward.
Main Over-All Findings:
1) OAs lacked sufficient HE ROM to walk with HE angle as large as that of YAs
2) When forced to walk faster (fast gait conditions), OAs lacked PF strength to match PF strength of YAs
Main Useful Conclusion:
The above findings “supports the hypothesis (proposed explanation) that HE ROM and PF strength are limiting factors in gait and contribute to age-related differences in gait”.
Main Action Step:
OAs should work to improve HE ROM and calf strength to help improve their walking performance as they age.
Main Caveats:
Will this alone solve all OAs age-related walking issues? No, of course not, as there are a host of other potential issues which could impair an OAs walking as compared to a YA. But, it’s an easy, science-validated place to start, especially if you haven’t had an individualized physical assessment.
This is a small study, so limited evidence, but study offers data from others that supports their conclusions. And calf strength & HE ROM are often lacking in OAs, so hard to recommend against improving these functional characteristics.
IMPROVING HIP EXTENSION ROM
When performing joint-tissue ROM (mobility) work, the main thing to keep in mind is the tissues respond best to frequency of stretching/lengthening work – the more frequently you do it, generally the better your results – it’s not particularly physically taxing like resistance exercise, but it does require some concentration and a resolve to perform often.
It’s challenging here to provide clear-to-everyone good technique/form advice, but performance-wise with stretching, look to create a small amount of discomfort with tissue lengthening and hold stretch for at least 15-60 seconds for more than one repetition (less time, more reps). For example, 60 seconds x 2; 30 seconds x 4; 15 seconds x 8.
The main body tissues limiting HE ROM are on the front of the hip and thigh, so extending leg at hip and bending leg at knee provide the tissue lengthening. An important factor to keep in mind is HE is often coupled with low back (lumbar spine) extension (1), so lumbar extension needs to be neutralized (prevented) to most effectively improve joint-tissue ROM at front of hip/thigh. You neutralize lumbar extension by: a) tipping/tucking the pelvis under (posterior pelvic tilt); b) contracting the abdominal muscles; c) moving non-target leg into hip flexion (toward front of trunk).
There are five positions OAs can utilize to work on improving HE ROM; and stretching in any of the five can be enhanced by contracting the target-side glute (butt) during stretch. Positions are as follows:
1) Half-kneeling
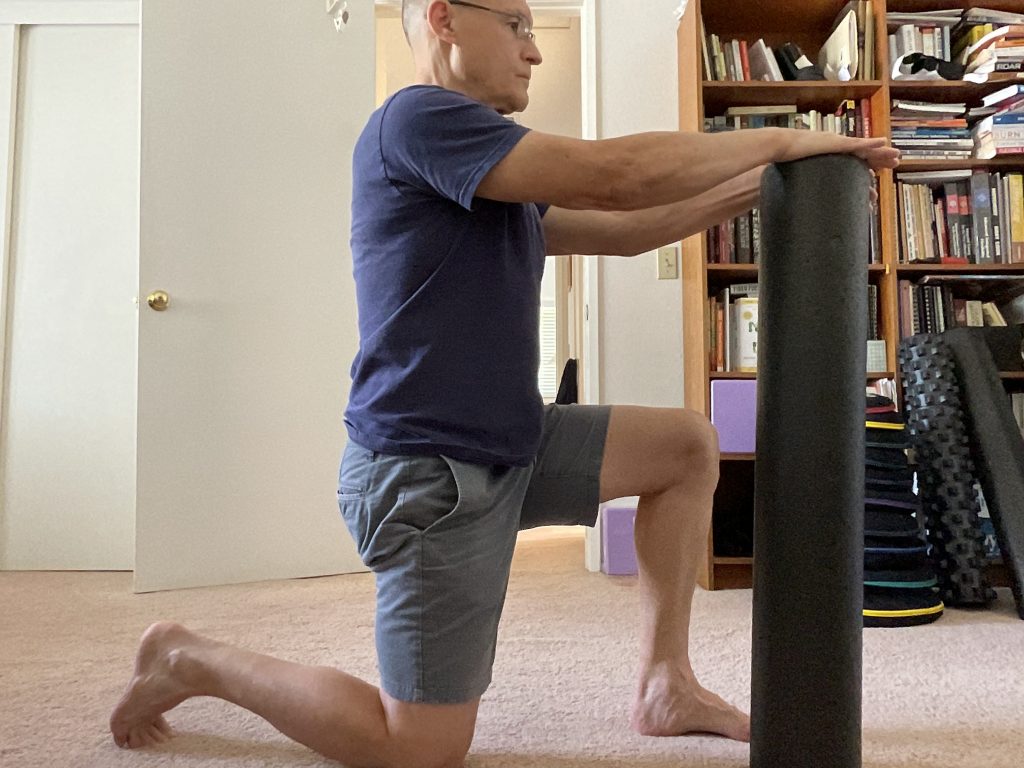
I consider this the most over-all favorable position to work on HE, but it can be hard for some OAs to utilize if they are challenged by getting up & down off floor or if extreme knee sensitivity precludes body weight on knee (although any kind of knee pad is acceptable as long as not too high off ground).
The image at right is correct form for half-kneeling HE stretch with down knee (right) side the target hip: a) pelvis tucked under; b) pushing down on foam roll to activate abdominals; c) glute contracted; d) slight forward movement pressure on hip; e) trunk tall. In place of foam roll you could use a stick pushing down into ground or a chair/desk/low counter. Any kind of pad could be placed under knee for comfort, as long as it’s not too high off ground which reduces hip flexion on non-target side.
2) Side lying – tipped over version of half-kneeling in photo with far (left side) on ground
Same getting off floor challenges as half-kneeling, and this position can be awkward for many joint-tissue mobility limited OAs to reach target leg which is behind body; may require a multi-looped stretching strap aid to be placed on target leg’s foot to facilitate effective stretch.
Using image above right as a reference, non-target leg side (left) is on ground with knee up toward trunk. Target side faces ceiling and you’d need to use left hand to hold left knee in place and right hand to grab right ankle behind your body to apply stretching force. If you had a strap aid, you’d loop around right ankle and over right shoulder and pull with right hand at chest level.
3) Standing in front-to-back stride position (back leg is target)
Good for OAs who find # 1& 2 inaccessible, but may require a balance aid for safety; harder to achieve & maintain posterior pelvic tuck; less help from non-target leg to neutralize lumbar extension so some lumbar extension is probably inevitable. The link above and here is a reasonable representation of what you’re trying to achieve.
4) Standing with (non-target) front leg/foot elevated on higher-than-ground surface (ideally, if safety allows, surface for foot should be at least high enough that your thigh is parallel to ground – 90 degrees of hip flexion – to help neutralize lumbar extension). Target leg is back leg with the foot on the ground. Link above and here is a reasonable representation of what you’re trying to achieve.
Balance & stability can be a limiting factor because only one foot is on ground, but excellent help from front (non-target leg) neutralizing lumbar extension if placed on relatively high platform.
5) Elevated surface, lying on back on edge of elevated surface with non-target knee pulled to chest (Thomas Test)
Low ceiling effect because limited by weight of target leg for stretching force; hard to monitor effective position by oneself; need sufficiently high enough surface to lie on so target leg foot does not touch ground. This 4-minute video by a physical therapist is great to explain this HE stretch.
IMPROVING CALF STRENGTH
Improving muscular strength requires resistance exercise. Improving calf strength requires performing “heel raises“ with a sufficient challenge (intensity/load/resistance) to create a positive strength adaptation, and the good news is heel raises are just about the simplest resistance exercise OAs can perform (although, like any resistance exercise, they can be “mucked up” if you don’t pay attention to form/technique).
Some tips to keep in mind for heel raises:
1) Effective heel raises will require raising your heels as high above ground level as possible each repetition (rep), pausing briefly, and then slowly lowering back down with a controlled descent.
2) Heel raises require the ability of your big toe to bend back toward the top of your foot (big toe extension). If you are lacking big toe extension, you will need to work on improving it before implementing heel raises – I see this most often in association with a bunion – but it’s relatively common for OAs to lack optimal big toe extension.
3) Your feet should be straight-ahead and you should strive to raise your heels up while keeping weight on big toe side of feet – straight up through big toe, not little toe side.
4) Knees can be straight or bent a little, but you want to avoid bending & straightening them within a rep, so I recommend keeping them straight throughout by contracting your front thigh muscles (quads).
5) Heel raises are performed bilaterally with both feet on ground/surface or unilaterally with only one foot on ground/surface. It’s relatively easy for many OAs to perform bilateral heel raises, so that’s your entry point, but it’s super challenging for most OAs to go from bilateral to unilateral, so following a proper progression of load/effort/resistance is very important.
6) For safety and stability your hands are on wall or elevated surface in front of you. Try to set yourself up so you can maintain a fixed arm-length away from wall/surface with only a slight lean forward (mostly vertical body position – firm arms keep you away from wall).
7) Abdominals should contract to provide core control and avoid the dreaded “banana body” of hips well ahead of legs & shoulders as your heels raise, i.e., keep hips stacked above feet.
* Sample Heel Raise Progression:
a) Everything below assumes 2 sets of reps at 2x/wk with 2-3 reps-in-reserve (RIR) each set (2)
b) Start bilateral with feet on ground gradually working up to 20 quality reps
c) Bilateral ground, and add enough resistance in one hand so performance limited by fatigue to 8-12 effortful reps; you’ll alternate resistance (dumbbell, kettlebell) in each hand for each set of reps
d) Keep adding a little resistance once you’re able go above 10-12 reps
e) Once you reach a limit to a tolerable resistance you can hold in one hand (grip strength, available resistance, etc.) you should switch to performing with feet on an elevated surface so that your heels can drop below the level of your toes creating a greater ROM (and workload) than ground-based heel raises – these are commonly called “deficit” or “elevated” heel raises – and be sure your elevated surface or platform is big/stable enough not to tip over – this is the exact platform (no risers, just 4-inch platform top) that I’ve used for myself as well as clients for quite a while, although there are several other versions of various brands
f) Go back and follow “b” through “e” steps for deficit heel raises; once you reach “e” you will need to switch back to ground-based heel raises on one leg at a time (unilateral)
g) Go back and follow “b” through “e” steps for unilateral ground-based heel raises; once you reach “e” you will need to proceed to elevated surface unilateral deficit heel raises
Footnotes:
(1) If your body can’t find HE ROM, it will look for it at the next joint available – lumbar spine extension.
(2) How hard does resistance exercise (RE) need to be? And, how do we monitor that degree of hardness or intensity? The most accessible strategy to gauge the intensity/hardness of RE is a concept called repetitions-in-reserve (RIR).
To use RIR, each time you stop a set of reps, ask yourself: “how many reps was I still capable of performing if I pushed myself to the absolute physical limit for this set of reps”? Your answer is your RIR for that set. If you think you still have 5 or more RIR, then your effort is probably not sufficiently hard enough to stimulate a positive physical adaptation that will stave off the physical declines of aging. The sweet spot for best positive physical adaptation is probably no more than 2-3 RIR.

Related Posts